
Welcome to Day 7 of the incredible Creative Christmas Countdown hosted by Creative With Kids and Red Ted Art. We cannot wait to share our fun holiday ornament with all of you.

In our home, we are always looking for ways to play and learn with nature. So, during the holidays, you will often find our family outside foraging for craft supplies in our own backyard...well, technically in the park...but you get the idea. Today I would love to share with you how to make a lovely holiday decoration that uses very simple supplies, twigs, and yarn.
DIY Twig Christmas Ornaments
twigs or branches
long vine-like twig or branch (we used Forsythia)
festive coloured yarn (we used red)
scissors
glue gun
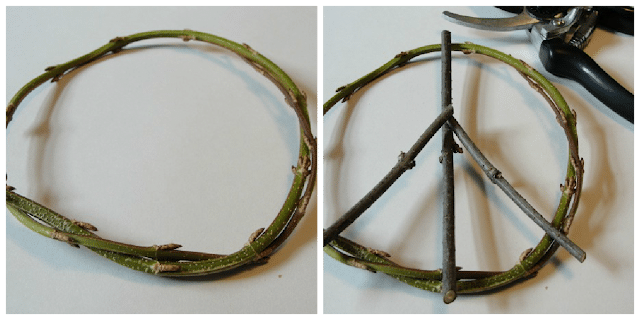
1. Bend and twist the vine-like twig into a circle.
2. With the scissors, cut the twigs to fit the inside of the circle, enough pieces to make the inside of a peace symbol.
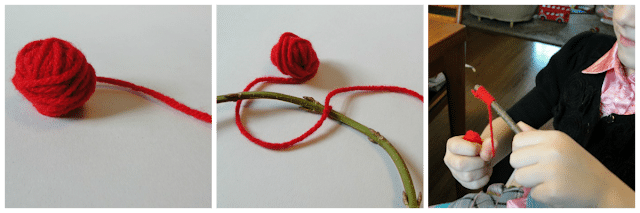
3. Make a ball of yarn that is easily held in your child's hand.
4. Knot one end of the yarn at the top of the circle, leave a tail of yarn that is a few inches long; this will eventually be part of the loop used to hang the ornament.
5. Have your child wrap the yarn around and around the circle (my daughter found wrapping the circle a challenge and she preferred wrapping the straight pieces) until they go all the way around and reach the top.
6. Knot the yarn in place and leave a tail of yarn that is a few inches long...tie the two tails together to create a loop to hang the ornament from.
7. Repeat the same knot and wrapping procedure for the other twig pieces...however for these pieces there doesn't need to be a tail of yarn left...clip the yarn close to the knot.
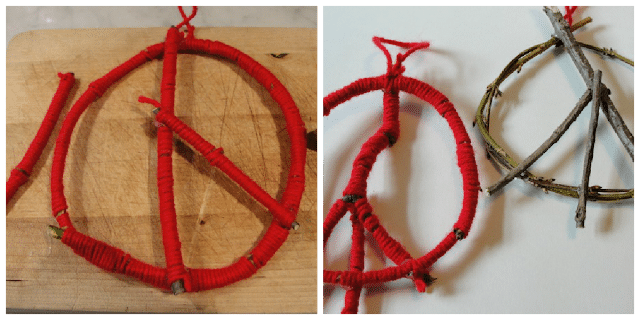
8. Use the glue gun to adhere the pieces together and create the peace symbol.
We made a number of these peace signs, some with and some without the yarn. I even made an extra-large one for the centre of our wreath, that is hanging on our front door. There is something special about the holiday season that makes me reflect on the beauty and the importance of nature and the joy of peace.

I hope that you are following along with the Creative Christmas Countdown, hosted by Creative with Kids and Red Ted Art. Discover all the details about this incredible online advent for kids. You can register for a daily newsletter, get the activity and supply list and find the complete list of the 24 bloggers who are celebrating the season.


jackie says
I just love these! I had a similar project in mind, but wasn't sure how it would turn out. You've inspired me to go for it!
Jen Farr says
Thanks Jackie! They turned out great...go for it!
Alissa says
Thanks Jen! Today when we walk down to the library we'll be seeking out twigs for ornament making.
Jill @ A Mom With A Lesson Plan says
I love how the yarn over the twig looks! What a great activity for working those small motor muscles.
Science Sparks says
oh they are lovely!