
For the last few years my sister, my sister-in-law and I have been going to a quaint little museum every November. At this sweet little house a lovely woman dressed in pioneer clothing teaches us about the history of the home and how to make a holiday wreath. Well, this year we forgot to register on time. As I sat in the grocery store parking lot one Thursday afternoon an idea popped into my brain. What if we made our own wreaths? What if we purchased a small $24 tree and clipped it down into 3 holiday wreaths. We had the skills, we could do it...I was pretty sure. So, this is how we transformed a Christmas tree into a holiday wreath.
How to Make a Holiday Wreath
1 5' Fir tree (fir will give you the best type of branches for the base of your wreath)
garden shears
1 bundle of cedar branches
1 bundle of holly branches
1 bundle of pine branches
1 wire coat hanger
floral wire
thin metal wire
pliers
wire cutters
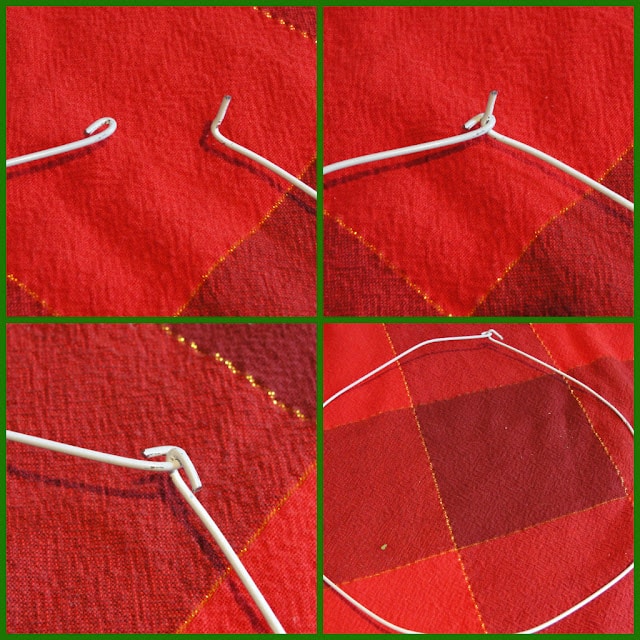
1. To make the frame for the wreath you can either purchase a wire frame at craft store or make your own. With the wire cutters cut the hook off the wire hanger. Shape the hanger into a circle. Make a small loop at each end of the hanger. Feed the loops together and then tighten the loops with the pliers.

2. To dismantle the tree, use the garden shears to clip all the branches off the tree. Trim the branches down to pieces that are approximately 6" long.
3. Purchase, or forage for, the assorted greens that will fill out the wreath. Make piles of each type of greenery on your work surface. We used boxwood, cedar, holly and pine.
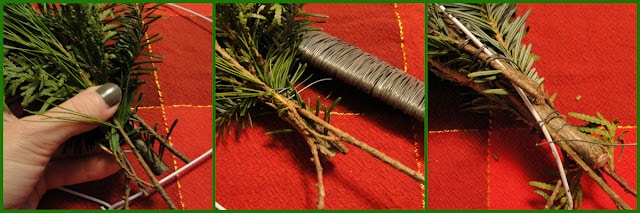
4. With the wire frame in front of you, bundle up a variety of branches...ideally 3-4 branches.
5. Wrap the floral wire tightly around the stem end of this bunch of branches...DO NOT CUT THE WIRE.
6. Place the bundle of branches next to the wire frame, now wrap the floral wire around the frame...securing the bundle to the frame...DO NOT CUT THE WIRE.
7. Gather a second bundle of branches, wrap with wire, secure to the frame.
8. The key is to NOT CUT THE WIRE simply continue wrapping around bundles and then the frame over and over again until you have made your way all the way around the frame.

9. When you make it all the way around, cut the wire and secure the end of the wire.
10. Create a hanging loop with either the wire or a piece of ribbon...the loop/ribbon can be secured to the frame.
11. Embellish the wreath as you like...add pinecones, ribbon, flowers, ornaments, birds, etc. I can't show you my finished wreath as I decorated my wreath with the decorations I will be making for the Creative Christmas Countdown on Friday.

All in all this was a fun way to make a wreath. In the end, we spent around $25 each on our wreaths (when you add up the tree, wire, filler branches). Next year I think we will probably head back to the museum. But, it was fun knowing that if need be, we could totally make our own wreaths.
Have you every made a wreath from scratch? What is your favourite thing to use to embellish a wreath? Simple, modern or traditional...what's your wreath style?
Looking for more ways to connect with your kids?
Follow Kitchen Counter Chronicles on Facebook, Pinterest, Google + and Twitter.