Kitchen Counter Chronicles

menu icon
go to homepage
  • Activities
  • Art & Crafts
  • Holidays
  • Recipes
  • Contact

subscribe
search icon
Homepage link
  • Activities
  • Art & Crafts
  • Holidays
  • Recipes
  • Contact

×
Home » fall

Tomatoes Part II

By Jen

Last week we took some beautifully fresh tomatoes and made a lovely simple soup. This week we wanted to find a way to make our tomatoes last. So, we thought about how we typically eat tomatoes and decided to take a chance making sun-dried tomatoes...well, technically oven-dried tomatoes. Here's what we did.

Oven-dried tomatoes
6 roma plum tomatoes
1 teaspoon salt
1 teaspoon pepper
1 tablespoon olive oil
1 teaspoon dried oregano
1. pre-heat oven to 200F (or as low as your oven will go)
2. line a baking sheet with parchment paper
3. clean and slice your tomatoes, lengthwise. The thickness of your tomatoes will determine how many slices your make. Our tomatoes were quite large, so we were able to get 4 slices.

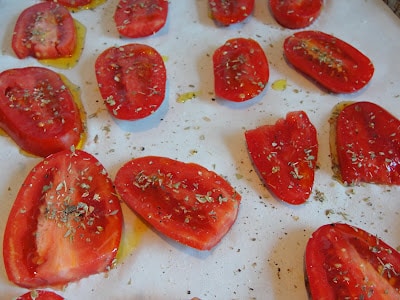
4. evenly space your tomato slices, cut side up, on the baking sheet

5. drizzle with olive oil

6. sprinkle with salt, pepper and oregano (oregano is optional, it's up to you)

7. place baking sheet into oven for 8-12 hours - we popped ours in the oven at 8am, they roasted all day long

8. the tomatoes need to be shrivelled, but not burnt...still pliable

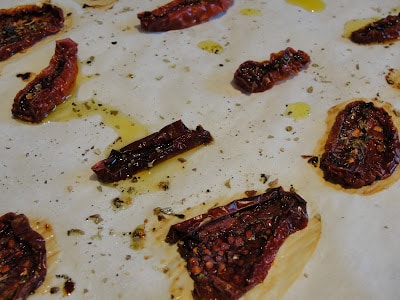
9. turn the oven off and allow the tomatoes to rest in the, turned off, oven until they are completely cooled (we left ours in the oven overnight)

10. once the tomatoes are dried, remove them from the baking sheet and place them in a glass jar or plastic bag
11. you can store with or without oil, keep refrigerated for up to 6 months

Not only do we have sweet and delicious oven-dried tomatoes, but our house smells divine. For breakfast this morning my youngest daughter put in a request for sun-dried tomatoes. She gave them a try, declared they are "great."

So, how do we use our sun-dried tomatoes? We add them to pesto, just blitz them in with the basil. We slice them and add them to salads. We process them and turn them into a tapenade to spread on bread. The options are endless. While they take a lot of time to make - they don't take a lot of effort. In fact, I think I'm going to pop another batch in the oven tomorrow. 

More fall

  • thanksgiving felt turkey craft complete and sitting on table
    How to Make a Felt Turkey Craft
  • print out of thanksgiving bookmarks uncolored with colored thankgiving bookmarks behind and pile of pencil crayons on top (1200 x 1200 px)
    Thanksgiving Bookmarks to Color
  • how to make a pumpkin veggie tray title with carrot pumpkin vegetable tray and bowl of dip
    Pumpkin Veggie Tray - Healthy Halloween Party Food
  • featured image halloween would you rather questions
    Silly and Spooky Would You Rather Halloween Questions for Families

About Jen

Jen Farr is a mother living in Toronto, Canada. She has been sharing her DIY crafts, recipes, activities and parenting advice for over 15 years on her blog Kitchen Counter Chronicle. Jen is the mom of 2 lovely daughters. She believes in the power of taking small steps that can make big impacts on the world.

jen profile picture

Hi, I'm Jen!

I’m the creative mind behind Kitchen Counter Chronicle. I’ve been making and sharing activities, crafts, and recipes for 10+ years.

Thanks for stopping by!

About Me

What's New!

  • Back to School Crafts for Tweens to Make

  • collage of back to school chapter books for featured imgae
    Best Back to School Chapter Books

SUBSCRIBE

Footer

↑ back to top

About

  • Privacy Policy
  • Feel free to use information and pictures from this site, but please credit their source and include a direct link to Kitchen Counter Chronicle. Thank you

Newsletter

  • Sign Up! for emails and updates

Contact

  • Contact

Kitchen Counter Chronicle is a participant in the Amazon Services LLC Associates Program, an affiliate advertising program designed to provide a means for us to earn fees by linking to Amazon.com and affiliated sites.

Copyright © 2025 Kitchen Counter Chronicle